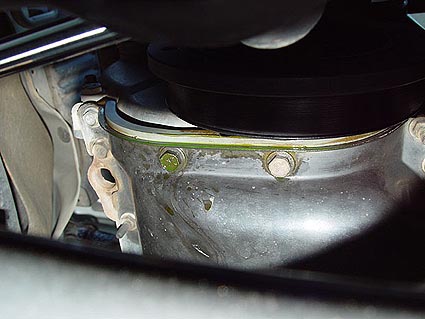
| (Main
Photo) The large photo above is looking up
at the engine from the front of the Jeep. Coolant can be seen
dripping from the front edge of the oil pan just behind the
crankshaft pulley. |
|
|
Replacing
Your Waterpump
(2000+
Jeep TJ with 4.0L Engine)
What
a total PITA!! At least that is if you're like me, an owner of a 2000+
TJ, with a bad water pump and out of warranty. Apparently, What should
have only cost about $34 wound up costing me a little over $120 and
all because DC decided to change the design of the water pump and
layout of the serpentine belt in 2000+ model TJ's with 4.0L engines.
Unfortunately, all the local autopart stores still indicate in their
computers that the previous pump (1997-99) is what should be used
in a 2000, but I can tell you first hand that it doesn't! I tried
getting a pump for an 01 or newer but wouldn't you know it, they don't
stock 01's or newer yet! Needless to say, I needed this part ASAP
and therefore went to the dealer, who did in fact have the correct
pump and allowed myself to get screwed to the tune of $120+ tax. Anyway,
I hope by the time you need to do this job, the part is available
(with a lifetime warranty like it should have) at your local parts
store and that this write-up will be of use to you.
What
You Will Need
•
New Water pump - Mopar $120
(if aftermarket available - $34)
• Standard Tool Set
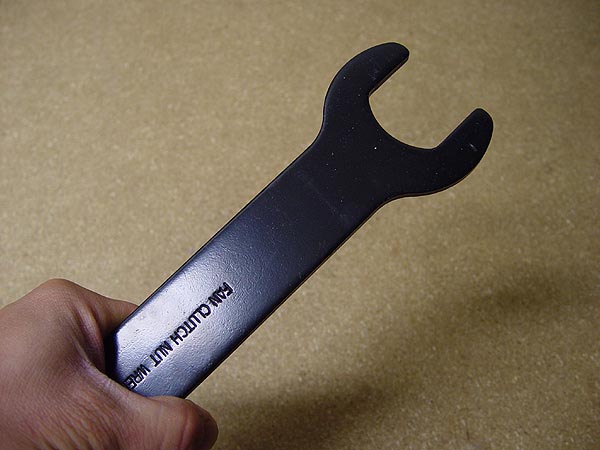
• Fan Wrench
• Strap Wrench
• Hose Clamp Tool or Large Channel-Locks
• Bucket
• Anti-Freeze
• Distilled Water
• Teflon Tape
• Permatex Gasket Remover
Installation
1.
Disconnect the negative battery cable.
2. Drain the cooling
system into a bucket by opening the valve located on bottom of the
radiator.
3. Disconnect the overflow
hose from the radiator and then remove the reservoir bottle.
4. Disconnect the upper
and lower hoses from the radiator using a hose clamp tool or large
channel-locks and disconnect the heater hose.
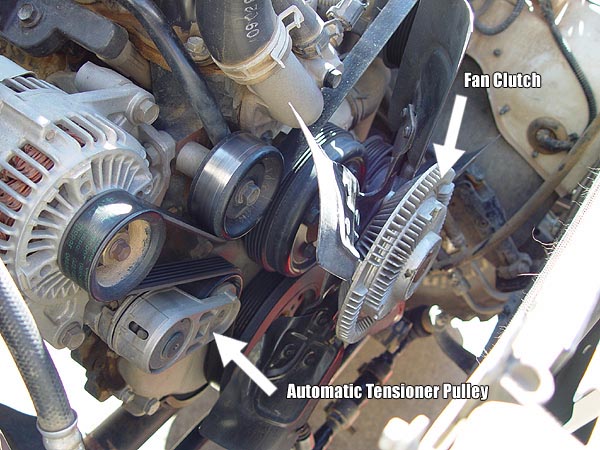
5. Unbolt the fan shroud
from the radiator
6. Place your fan wrench
on the fan nut and give it a slight tap or two, counter-click wise
with a hammer. This should be enough to loosen the nut so that it
can be screwed off by hand. Be careful as you approach the end and
slowly pull both the fan and shroud off together. Be mindful of the
radiator as you do not want to damage it by accidentally bumping into
it with anything. Also, unless you are planning to replace the fan
clutch at this time, be sure to set the fan in an upright position
and NOT lying down. Lying the fan clutch down horizontally
will cause the silicon fluid to drain into the bearing assembly and
contaminate the lubricant.
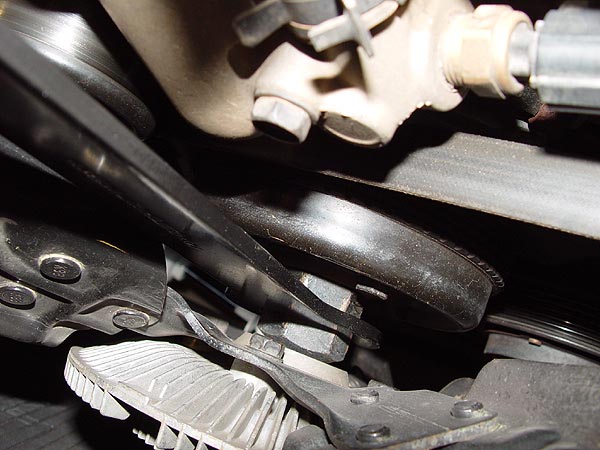
7. Remove the serpentine
belt by pushing down on the automatic tensioning pulley and then sliding
it off. To do this, simply take a 1/2 drive ratchet (no socket attached),
stick it in the square hole, and use the ratchet as your lever to
apply pressure to loosen the tension on the belt. If you do not have
the original diagram on the radiator showing the routing of your belt,
be sure to draw a diagram of it first.
8. Using a strap wrench
to hold the water pump pulley wheel in place, remove the four bolts
holding it on and then un-bolt the water pump from the engine block.
9. Stuff a clean rag
into the hole in the engine to prevent any debris from getting in
and then carefully proceed to scrape off all the gasket material from
the engine block. If you spray it with some gasket remover ahead of
time, it will make the job a lot easier. Take you time at this as
you won't want to have to re-do it.
10. Disconnect the heater
hose fitting from the top of the old pump as well as the bottom radiator
hose. Clean the threads and apply some teflon tape to the heater hose
fitting and then install it on the new pump. Be sure to take note
which direction it needs to be facing.
11. If you are replacing
your radiator hoses, do it at this time or if they are still in good
shape, re-install the bottom radiator hose onto the new water pump
12. The new water pump
should come with it's own gasket that has a silicon bead. DO
NOT use any RTV but be sure to have the silicon bead facing
the pump when installing the pump and then evenly torque the bolts
on at 200 in. lbs. (17 ft. lbs.) Rotate the shaft by hand to make
sure it turns freely.
13. Re-install the pulley
wheel onto the waterpump using a strap wrench again to hold it in
place and then re-install the heater hose.
14. Re-install your
serpentine belt (I decided to install a new serpentine belt at this
time) being careful to route it exactly the way it was on before leaving
the automatic tensioning pulley last. Using a large flat-head screw
driver placed in a groove on the pulley arm, I depressed it until
I could slide on the belt.
15. Carefully re-install
your fan and shroud.
16. Re-connect the upper
and lower radiator hoses as well as the overflow bottle.
17. Refill your cooling
system, re-connect your negative battery cable, start your engine
and then check for leaks.
I think I've covered all the bases but if you have any questions,
please e-mail
me. If you don't already have one, an FSM (factory service manual)
of you're exact make and year is something every Jeep owner should
have. |
|
|