|
|
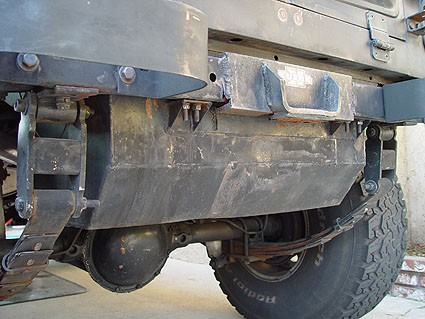
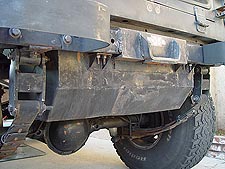 This
is what I started out with
This
is what I started out with |
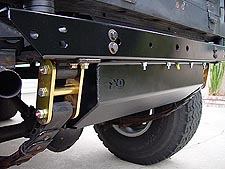 This
is what I ended up with
This
is what I ended up with |
|
|
|
New
Rearend for the CJ
When
I bought my 1981 CJ7, it was with the complete knowledge that it would
need a lot of help before it could be driven safely. The kid who owned
it before me, or maybe even the guy before him, had really done a
number on this poor Jeep and every fix was a total slap job. In the
case of my rear cross-member, someone had done a real POS job welding
on a homemade trailer hitch made of ¼" steel and drilled
holes all over the underside in order to bolt up an aftermarket 22
gallon steel tank. Well, whatever was towed (something heavy, that's
for sure) in conjunction to the all the holes and bad welds, the factory
cross-member was toast. Needless to say, this was high on my list
to have fixed.
What
You Need
To
begin this project, I picked up my trusty 4WD Hardware catalog and
ordered a new Omix Ada replacement rear frame cross-member (part#8127711),
which cost me $59.95. The new cross-member is made of 1/8" steel (which
is considerably beefier than the factory unit) and comes unfinished
as it should. I also searched far and near and ultimately picked up
a used factory 20 gallon plastic gastank from the 4Xdoctor's as well
as one of their awesome skid-plates. Along with a new sending unit,
strap, check valves and filler tubes, I wound up paying about $420
for everything. If this is something you are interested in doing,
be sure to ask for Mike Duncan.
• Complete set of SAE sockets and box wrenches
• Good Torque Wrench
• 4 - 2.5 Ton Jack Stands w/21" height or greater capacity
• 1 - 2.5 Floor Jack w/21" height or greater capacity
• 1 - Hi-Lift Jack or good bottle jack
• Breaker bar or steel tube
• PB Blaster Torch
• Jigsaw or Reciprocating Saw w/metal blades
• Hand Drill w/metal drilling bits
• Hacksaw
• Files
• Safety Goggles
• Welding Equipment
• Good Gloves
• Cinder Blocks
• Wheel Chocks
• 2x4
• Primer Paint
• A Helping Hand
Installation
Prep
Work
1.
Before breaking out the jack, stands and tools, I first made sure
that I was low on gas, siphoned off whatever was left in the tank
(every gallon you leave in is another 8lbs you have to deal with)
and then disconnected the negative lead to the battery.
2. Even
though this Jeep has always resided in California and was really rust
free, I went ahead and did myself a favor by dousing every bolt I
knew I would need to work on with some PB Blaster. If you live in
a rust belt state, this should be a must do days before and then everyday
after until you actually start on a project like this. The bolts you
will need to hit are the ones for your body mounts, bumper, spring
hangers, and gastank skidplate or hangers.
3. Unfortunately,
because two of the body mounts holding your tub to the frame are actually
attached to the rear cross-member, you will have to do what essentially
amounts to doing a body lift during this project. So, if you haven't
already done a body lift or have always been meaning to replace your
old rotten mounts, now would be a good time to think about it. With
that said, chock your tires, make sure you are on level ground, loosen
all five body mount bolts on the passenger side of your Jeep and the
one under the grill. Now, remove the five bolts on the driver side,
place a 2x4 under the rocker and jack up your tub just enough (I used
a Hi-Lift but a bottle jack on block should do the trick too) to remove
the body mount on the rear cross member. Refasten the bolts on the
driver side loosely and repeat the process on the passenger side.
Once both mounts have been removed, re-tighten all of the remaining
body mounts.
Off with the Old
4. Start off
by placing a floor jack under your tank and crank it up in preperation
to lower it. Unscrew the all the nuts along the rear cross-member
and the one under the tub holding your gastank up. With the help of
a friend, slowly lower your tank just enough to disconnect your filler
tubes, fuel and check-valve lines as well as the positive and ground
leads (be sure to mark each fuel line now so you'll know where everything
goes when you re-install everything). Fuel will most likely pour out
of their lines and should be plugged up and temporarily moved up and
out of the way. Now slowly lower your tank all the way down and set
it aside for now.
5. Okay,
with all the prep work done, it time to start busting knuckles. Chock
your front tires and then loosen the lug nuts on your rear wheels
and spring hangers just a crack so you don't have to jerk your Jeep
around while it's up on stands. Now jack up the rear end of your Jeep
from the pumpkin until both tires are off the ground. Place stands
under the frame next to each of the spring hanger in front of your
rear wheels and then slowly lower your Jeep down onto them (I have
a 4" lift and 35" tires on my Jeep and wound up needing to put my
stands on a cinder block in order to get enough height). Make sure
the stands are sitting flat on all four corners and stable before
doing anything else. Now, get a couple more jack stands, place them
under your rear axle, remove your tires and then lower your axle almost
to the point it's suspended by the springs. Unbolt your shackle hangers,
rotate them down out of the way and then lower the axle until it's
sitting on the stands. From here, your Jeep will be on stands for
a while so once again, for your protection make sure everything is
stable and well planted on the ground before proceeding.
6. With
your Jeep effectively incapacitated and on stands, go ahead and remove
your bumperetts and the bracket that attaches it to the frame rails.
Check behind your cross-member and make sure there isn't any wiring
attached to it or anything else you wouldn't want to accidentally
cut. Now come the real PITA part of the project. Using a jigsaw and
metal cutting blades, I proceeded to slowly hack off the existing
cross-member. I made a total of four cuts with the blade parallel
and as closely to the frame rails as I could. I then carefully and
as close to the edge as I could, cut the remaining face piece still
covering the frame tube. Make no mistake, this was a real job with
a jigsaw and I ultimately went through a dozen blades. If you have
better tools at your disposal, I highly recommend using it. With that
done, you will still have a small piece of the original cross-member
attached to the top of the frame rail. Now this would otherwise be
no harder to remove except that your tub is in the way and therefore
a jigsaw cannot be used here. So, I broke out the ole hacksaw and
after sore arms and a couple of bloody knuckles, I eventually knocked
them off.
On with the New!
7. After licking
my wounds and a days rest, I started getting things ready to weld
on the new cross-member. As with any welding project, good prep work
can make all the difference. So, break out the files and grinder and
clean up your edges, level things out and make sure you have a good
amount of bare metal showing where you will be welding. Be sure to
do a test fit to make sure your new cross-member will go on straight
and that you do not have huge gaps between it and the frame rails,
otherwise you'll have problems doing good welds. My Jeep had a couple
of broken nut inside the frame rail (where the shackle hanger bolts
attach) and I took this time to weld on new ones.
8. When
everything looks good and fits right, place your new cross-member
on your frame rails and center it. To hold it securely in place, I
bolted on the shackle hangers and they basically clamped the new cross-member
in place. Using a Lincoln 110 welder with flux-core, I laid down a
bead along either side of the frame rails and had thought about adding
some gussets on the inside for added strength but decided against
it out of fear my new 20 gallon tank wouldn't fit. After things cooled
off and I took some time to inspect the welds, I removed the shackle
hangers again, masked things off and sprayed a couple of coats of
primer. After sanding down the primer, I then added a couple coats
of Gloss Black Industrial Strength Rustolieum to finish it off.
Wrapping it Up
9. Now that
it's time to put things back together, start by re-installing your
shackle hangers, the brackets that attach to the frame rail and cross-member
(for your bumper) and then your springs. Throw your wheels back on
and then set your Jeep back on all fours. From here, you should re-install
your gastank and if you marked all your hoses as I had suggested earlier,
this part should be a piece of cake. Last but not least, repeat Step
3 and install the final two body mounts. Unless I forgot something,
that should be it! You're done!
10. As for me, I decided to take this time and change out the
way tall shackles and rotten bushings I had on and replaced them with
M.O.R.E ½" greasable lift shackles and black poly bushings. Once again,
if new shackles or replacing your bushings is something you are considering
doing someday, now would be the time to do it especially considering
your gastank is already off.
11. Because my previous gastank was a beat up POS, I also decided
to do a factory 20 gallon tank conversion and install a new 4Xdoctor
skid plate for it. Did you know that 1981 CJ7's didn't offer a 20
gallon tank as an option? Well, I sure as heck didn't and after a
couple of hours struggling to make everything fit, I wound up having
to bring it back down, do some hacking to the skid and drilling new
holes in the frame to make it all work. It took some effort but after
a test fit without the tank in the skid, I primed and painted it with
four coats of Satin Black Rustolieum. If this is a mod you are considering,
save yourself the grief and be sure to do a test fit first.
Working
on and off, this project took me (for the most part by myself) about
two weeks to complete. However, I would guess that with air tools,
a plasma torch, some friends and working on it 8 hours a day, it could
be done in about four days. That's including painting down time. |
|
|