|
|
TeraFlex
Adjustable Front
Track Bar Rebuild & Installation
After
installing a 3" Lift on your Jeep, you will either need to install
a new adjustable front track bar or relocate your OEM track bar by
drilling a new mounting hole on your axle flange 9/16" towards
the driver side. This is needed to re-center your front axle as it
has now shifted over towards the driver side of your Jeep enough to
be noticeable and cause problems.
I myself was just about to re-locate mine when michaelturtle1 came
along and was kind enough to offer me his old TeraFlex adjustable
one. It's a good thing too cause I don't like drilling anymore holes
in my Jeep than I absolutely need to. Anyway, the track bar was free
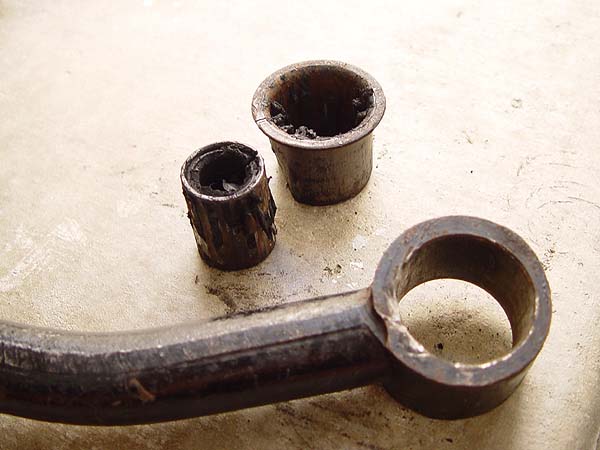
but it was also in serious need of a rebuild. The biggest problem
I was faced with was the bushing that is used to connect to the axle
end had completely frozen up in the track bar and the connecting bolt
had been cut off on either end plugging up the hole. The other problem
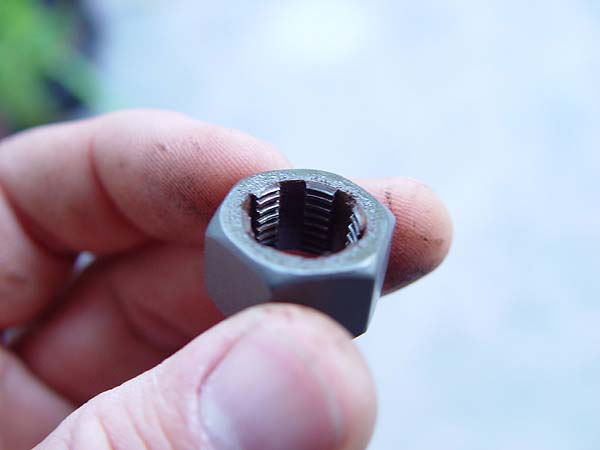
I had was the ball joint tapered stud had smashed threads and a stripped
castellated nut. Not good but not impossible to fix either.
What
You Will Need
Rebuild
• Energy Suspension Front Track Arm Set (Part#2.7102)
• Re-Threading Nut Tool 1/2-20
• Drill
• Propane Torch
• Flathead Screw Drivers (1-small, 1-big and long)
• Bench Vice
• Hammer
• Ratchet
• SAE Socket Set
Installation
• Pitman Arm Puller/Pickle Fork
• New Cotter Pin
• 3 lb. Hammer
• 19mm, 15mm sockets
• Torque Wrench
• Needle Nose Pliers
• Pry Bar
• Floor Jack
• (2) Jack Stands
• Wheel Chocks
• Grease Gun
Rebuild
1.
Before I did anything, I decided to look for a new bushing for a front
track bar. If I couldn't track one down, there would be no point in
doing anything else if you know what I mean. Believe me, this was
actually a lot harder than I thought. The first place I check was
at the dealership thinking that if anyone would have one, it would
be them.... WRONG!! If you want a new bushing, you have to buy a whole
new track bar!! So, I went looking at my local parts stores and nope,
they didn't have anything either. Finally, I called Energy
Suspension (they make all kinds of poly bushings) who
is located just a few miles from me and they told me that they did
in fact make one but that they didn't sell directly to the public.
Well, long story short, I was finally able to track one down at my
local 4wheelparts
store and it cost about $15.
2. Okay, time to remove
the old bushing. Piece of cake right? LOL!! Man, this thing was a
PITA. In order to remove it, I had to drill a series of holes all
around the circumference of the rubber core. Then, using a torch,
I burnt out the remaining rubber until it became brittle enough to
pry out with a screwdriver.
3. That was just the
beginning. After removing the core, there was a metal sleeve that
had to be removed too. I'm guessing that the original rubber bushing
was molded into this sleeve and then pressed into the track bar Anyway,
using a hammer, i pounded a small flathead screwdriver in-between
the sleeve and track bar and pry it back as far as I could. Then,
holding the bar in one hand, I started to hit the pry back edge of
the sleeve using a hammer until the whole thing fell out.
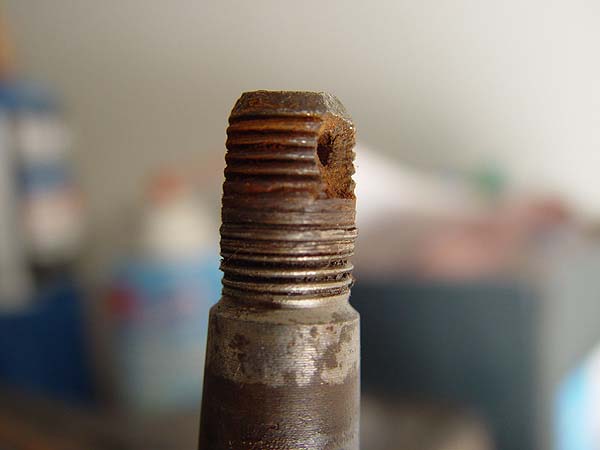
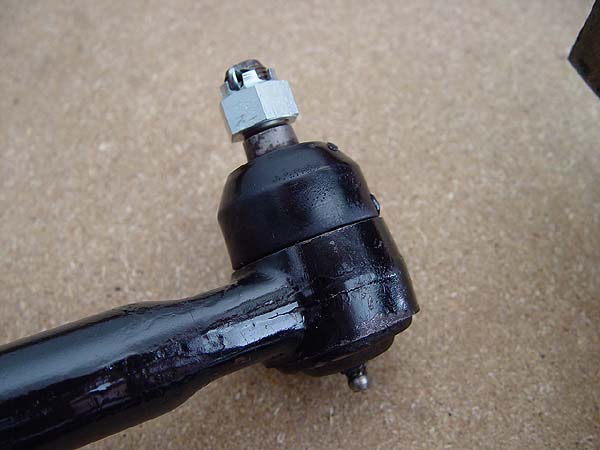
4. Onto the ball joint.
As I already mentioned, the threads on the tapered studs were totally
smashed. To fix this, you will need to use a re-threading tool (I
believe it was a 1/2-20) like the one shown to the right. Just take
your time and back out often and you will get nice clean threads again.
If it's still on, remove and throw away the old rubber dust cover.
You won't be needing it.
5. At this point, I
decided to take the whole thing apart, wire brush it free of rust
and then gave it a nice coat of gloss black Rustolium.
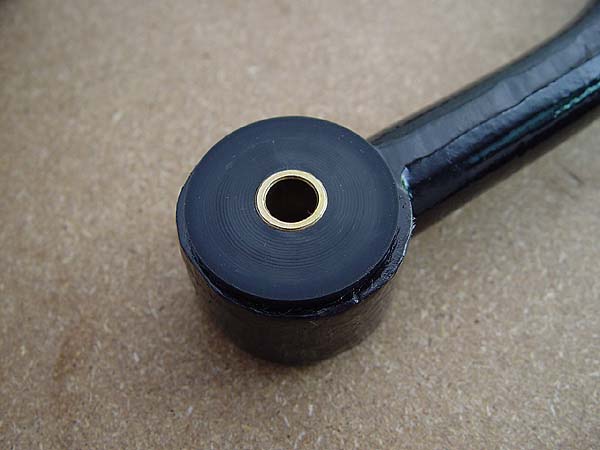
6. Once the paint is
dry, apply some of teflon lube (supplied with the bushing kit) to
the two half's of the bushings and then assemble it on to your track
bar as shown in the pic to the left. There should be a zinc plated
sleeve that goes through the center.
7. Install the new poly
dust cover supplied with the kit onto the ball joint and you are done.
Front
Track Bar Installation
1.
Park on level ground, chock your rear wheels, jack up the front end
of your Jeep and then set the frame back down onto jack stands just
behind the lower control arm brackets.
2. Place your floor
jack under the center of your front axle and lift it up enough to
get the tires just barely off the ground. This will help take the
pressure off the OEM track bar for removal and make it easier to install
the new track bar later.
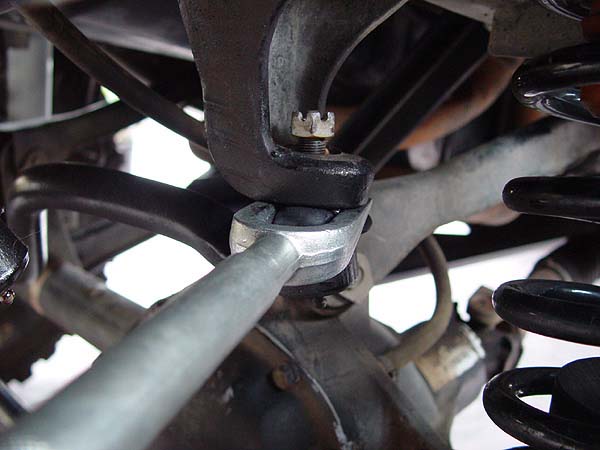
3. Using a pair of needle
nose pliers, remove the cotter pin from the ball joint stud. This
is where the track bar is attached to the driver side frame rail.
4. Loosen but do not
completely remove the castellated nut, insert the pickle fork in between
the frame rail bracket and the rubber ball joint boot and then tap
it with a 3 lb. hammer until the stud mount pops loose as shown in
the pic to the right. Leaving the nut on the stud just prevents the
whole track bar from falling once it comes loose.
5. Remove the castellated
nut and then lower the track bar down. Now remove the bolt and flag
nut attaching the track bar to the axle and pull the whole thing out.
6. To minimize the amount
of adjusting you will need to do, try to set the length of your new
track bar as close as you can to where it needs to be before you install
it. In my case, I just installed a 3" lift and therefore set
it to about 9/16" longer than the OEM (the same distance needed
to re-drill the mounting hole on the axle).
7. Slip the ball joint
stud through the frame rail bracket, fasten the castellated nut on
top to 65 ft. lbs. of torque and then insert a new cotter pin.
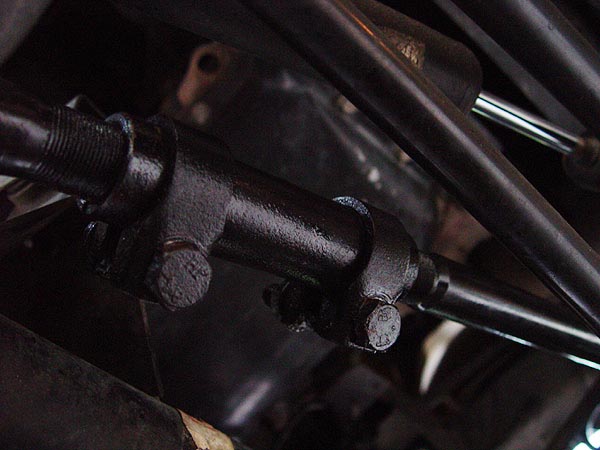
8. Installing the new
track bar on to the axle end will be a bit more tricky as none of
the mounting holes will be lined up now. So, slide up the track bar
up into the axle mounting bracket and try to get the hole to line
up as close as possible. Now, insert a small pry bar in between the
mounting bracket and the end of the track bar (see pic to the left)
and then pry the whole axle over a bit until the mounting holes line
up enough for you to slip the bolt through.
9. Fasten the bolt to
the flag nut and then crank it down to 55 ft. lbs. of torque.
10. Check to make sure
your front axle is center again by measuring how much your tires stick
out of your fenders on both sides.
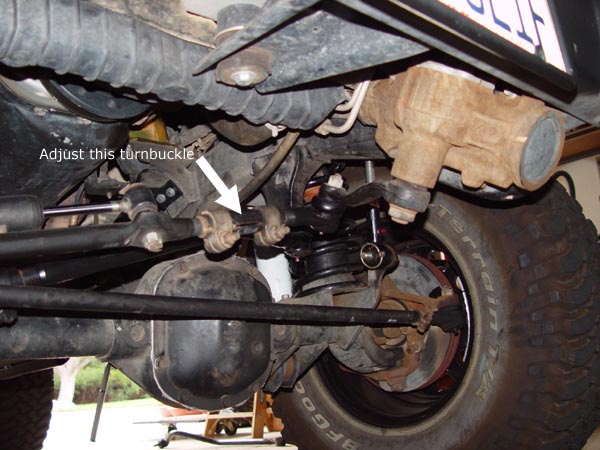
11. If further adjustment
is needed, just loosen the bolts/sleeves holding the turnbuckle in
place and then rotate the whole thing. Once your axle is centered,
re-tighten the bolts and you are done.
12. Lower your Jeep
and check to see how far off your steering wheel is off center.
13. My steering wheel
was off about a 1/4 turn to the right after the install. To fix this,
set your front wheel as straight as possible, loosen the turnbuckle
bolts on your drag link and then rotate the whole thing until your
steering wheel is centered again. Tighten up the bolts (make sure
they are facing foward so they don't interfere with the track bar)
and then take your Jeep for a spin. If your steering wheel is still
off, repeat this step until it is on.
That's pretty much it. Please let me know if you have any questions.
Post
Installation Notes
I
have talked to a lot of guys regarding the TeraFlex's adjustable front
track bar and need I say that there is some debate about it's design
being weak. I cannot tell you one way or another whether or not this
is true but I will be sure to let you know if I come across any complications.
|
|
|